Make money by selling your used books on-line at Powell's!

Sell your books to Powell's
Showing posts with label Saving Money. Show all posts

Monday, November 14, 2011

Great Gift Idea Monogram Photo Letters

I found this great idea on-line and wanted to make it for a certain person for Christmas, so Heather, if you are reading this....PLEASE LEAVE MISSY, lol.  The link to the original post the crafter put up is broken now, so I can't credit her post, or find her again, but I will walk you through it, it's super easy.


Here is a list of what you will need:

1 letter, I used a 22 inch paper mache letter, but you can choose smaller or wood, makes no difference.  $10
1 bottle 2 oz of black (or whatever color you like) paint.  I bought Apple Barrel gloss black. $1
1 8 oz Mod Podge (uses very little so if you already have some, use it). $5
1 Spray can of Krylon Low Odor Clear Finish (uses very little so if you already have some, use it).  $8
1 printer with black ink and paper loaded
Paint brush
Foam brush

So if you already have your printer, paint brush and foam brush, you pay full price for the above it will cost around $24.  Prices are as of today, November 14, 2011 and will vary from store to store.

Go get the letter of your choice.  There just happens to be a coupon for this week (Nov 13th - 18th 2011) at Joann's where I found mine, 50% off....WooHoo.  You can also purchase everything else there.  Have your significant other, kids, whoever you can find print out a coupon and go through the line for you as well and you can make this for around $12 or so.

Lay some newspaper down on a flat surface and With your paint brush, paint the letter black on one side and down the sides...wait for it to dry...flip it and paint the other side.


Here is the paint I used, but use what you would like and  remind me to paint my own nails before pictures of this kind!
I just squirted and smoothed....repeat until.......
You get it covered all over.
Let it dry on the first side.  Flip and paint the other side if you want.  I did, I think it looks more finished and makes it sturdier.

My letter was 2 inches across.  I put all my pics into Microsoft publisher and adjusted them to 2 inches wide.  I also brightened them, then I printed them, making sure my printer was set to do black and white printing only.  You could do color if you wanted, but I like the look of the black and white.  I tried to do a print screen here, so I could show you, but it did not want to work.  You could also use Word or even Google Docs and get the same result.


Lay out your pictures with some over lap.  This is why when adjusting in publisher, you can make some bigger so that the persons face is bigger, knowing that you will trim the background.  Once you have the look you want, start trimming.  I used a pencil and lightly made marks on the front of the picture, then trimmed carefully, not wanting to have to print anything again.  Then glue the piece down and trim and glue the next and so on. I went from bottom to the center, then to the top.  Be sure to follow Mod Podge directions, if you are like me and can't see the itty bitty, little teeny, tiny......well you get it....print on the darn bottle, Plaid is nice enough to post it all on-line, with video for us right HERE.  Then you let it dry and brush over the top, once again following the directions HERE.  Let dry.  I let mine dry over night.

Next, take it to a well ventilated garage or outside.  I put mine in a cardboard box, picture side up and sprayed from about two feet away with the Krylon spray.  You can find out the best techniques HERE.  I like to give the you the manufacturers instructions in case something goes wrong, that way you can take it up with them, not me.  Hahhha.  Here is he end product.


I think it turned out well and will look terrific on her wall.  She is a picture junkie, so this is a great personalized gift....I think anyway.  I think I will use my glue gun to place some picture hooks on back and hang it with a pretty ribbon.  I am thinking black and white stripes, what do you think?  Stripes... poka dots..solid?  You choose what you think and I will post the end result.

Merry crafting and thanks for reading.  As always, I love comments, so leave some so I know how I am doing.

Wednesday, November 9, 2011

More thrifting...STOP ME ALREADY!

My thrifting money is usually whatever I get from cans and bottles.  Today I took back a bunch and bought a box of Capri Suns (Devin's lunch) and a pot pie for me.  Never get this stuff, but today, I admit it, it was good. My change was $17.49.  With the change I thought I would stop at my favorite thrift shop.  I needed a fat separator for making gravy this thanksgiving and had told my cousin I would look for Christmas books for her new baby, she wants to read a Christmas story a day during December to him.  Fabulous idea.  My favorite Christmas book is The Other Wise Man by Henry van Dyke so I was hoping to find a copy.  I knew I had to buy a new pair of pinking shears from Joann's also, so I could not spend much.

But I walked in and saw this:


Did I need that...NO!  Was it the cutest little rocking chair I have ever seen....well, yes, yes it was.  I asked her how much and she said $5 flat and I said sold.....do you see the sold sign on it?  Yep, that is because I bought an antique children's rocker in great shape for $5.  Now what the heck am I gonna do with it you ask?  Mark asked too.....Well, I think I may just keep it for the time when I have grandchildren.  Devin even thought it was the cutest children's chair he had seen.  I REALLY like it. Am I defending this purchase for all I am worth right now, well, yes, yes I am.  Why?  Well look at it again.....if my behind could fit, I would be rocking for all I am worth right now.  See, look from this angle.....now you can see the cute little feet.  Uhhem.......


I also found my fat separator and some cute little loaf pans.  I may be using the loaf pans for the children's kitchen I want to build from the last post.


Not sure why the picture insists on being sideways, but you can turn your neck, lol.  All of these were $1 total.

Next the books.  Did I find my favorite?  Well yes I did.....


Three are just paper backs, but still perfect for finding favorites.  They can always buy hard backs of the ones they really like later.  Cost, $.40 for all.  Yep, $.10 each.

Last but not least, my oldest daughter lives in a small apartment and has never had room for a tree.  This one will fit though and she is excited to get it!


I like real trees, but this one will work for her and not cost her money each year.  She works full time, lives on her own and goes to college.  It is a brand new, never been opened 31/2 foot tree.  It cost me a whole $1.  Have I told you how much I love thrifing?  Total cost for it all..$7.40.  I LOVE thrifting!

I also managed to stop at Joann's and using my 50% Michaels coupon (yep, they take Michaels coupons for craft type items) I got a nice pair of  Fiskars pinking shears and 5 sheets of scrap booking paper, used a 25% off from Michaels for that and it was on sale 5 sheets for $.95.  Grand total?  Well, you can see.

Yep.....$11.70

Won't the scrap book paper make great wall paper and carpet for the barbie house I want to make from yesterday's post?  Oh and I love when the savings in more than the total cost......YAY!  I hope you have a great time thrifting and using your coupons too this holiday season.  It will take a lot of the burden off and leave your bank account better off this season!

So I went over by a dollar or so.....have you got a point? Hahhhaaa

Monday, November 7, 2011

Christmas Ideas for Girls

Christmas is right around the corner again....how the heck did that happen?  I know I have not been posting like I should, but stuff just keeps happening that prevents a long post.  SO, I am going to start doing short little posts (that will probably end up long) in an effort to keep you up to date on what I am doing.

I finally have some little girls in my life again, I may be reaching for them actually. Just miss the little girl fun and things, little girl things are the best, well for us girls.  You may be able to use some of this, so in researching things, I will share others posts.  Here are a bunch of great, fast, little girl projects.  I have become a great fan of the Goodwill bins for sources to get these things done.

Building a Barbie doll house out of a dresser.  I will be tackling this one this year.  Amazing!  Not hard at all....any of us could do it.  Here is the link: http://www.just-in.com/recycledDresser/index.htm  Thank you Just in Designs for this one.  I think peel and stick vinyl and carpet tiles from the dollar store and some scrap-booking papers will make this wonderful.  I wonder if I can manage a roof top garden out of paint?  I have a hot tub found at a thrift store for almost nothing that will look nice up there!

As a child my cousin had a great kids kitchen and then my daughter Naelyn had one.  I love them!  My son probably played with it the most.  They inspire future chef's and if a child has never made you pizza or tea, you are missing out!  Here is a great plan for a small kitchen you can do yourself from an end table.  I think this will be a project for next year! http://landofozfam.blogspot.com/2010/12/i-shouldnt-say-never.html  Thank you Land of Oz Fam for this cute post.

I personally lucked out at the Goodwill bins and walked away with this:

It cost me $3.00.  They usually go by weight, but you can ask how much for a certain item that is over weight and they will give you a reasonable price.  This is built so well I could jump up and down on it, so I consider myself more than lucky.

I had two flannel pillow cases from the thrift store that had cute little roses on them.  I got them two for $.50.  I sewed a mattress and filled with some of the roll of batting I got, brand new in the package, at the same thrift store for $.50.  Here it is with the mattress.


I made a pillow with the scraps and some more batting.


Then I made the quilt, quilted it and added yarn ties.


Had to show it with the "creepy" doll....thanks Devin, he thinks she is really creepy, lol.  This is only a 12 inch doll, but the actual mattress size of this bed is 22 inches, so this will fit a lot of different size dolls.


I am excited to give this to the little girl it goes to and not bad for around $4.00.

Hints for thrifting.  Thrift often through the year with your projects in mind.  Carry a fabric tape measure in your pocket.  My sewing one works just fine.  That way I can see if things will fit in a space or be the right size for a project.  Always think of ways you can re-purpose something.  Check out the web site of the thrift store, sometimes they have "cards", discounts or coupons....save all you can.  If you know you will be digging, bring a dust mask and some gloves.  At the Goodwill bins carry in your cash or debit in a pocket and nothing else, no purse or visible jewelry.  Most of all have fun!  I do!

Wednesday, January 26, 2011

Spring Cleaning

I am thinking about the end of winter.....the sooner the better in some places for some of you.  When it does end, I love to open up my whole house for a day, turn up the music and clean like a crazy person!  We have all been locked in for way too long by the end of winter and our houses need to be aired out.  With this in mind, I am thinking about it a little early this year because I plan on making my own environmentally safe cleaners.

Now, I know this sounds like a lot of work, but have you priced the majority of the cleaners?  Crazy what the word "green" does these days to the price of anything!  I plan on spending very little and getting a whole lot of clean.

Here is my first recipe.  I have tried this and LOVE it.  My kitchen is glowing.  My cabinets, which are very old and need to be replaced look great.  I won't be re-thinking the replacement, but honestly, they look better than when we first moved in five years ago, just from this one cleaning.  I have been trying everything for five years and nothing worked even close to this well!

Save the peels from 4 oranges (I put the peels in a ziplock in the fridge every time someone ate one.  You can also use lemon or lime, but only the peel, no pulp at all.)
1/2 cup plain white vinegar
Half gallon of tap water

Bring the water to a boil and add peels.  Turn of heat and let cool with peels steeping in the water.  Once cooled to just warm add the vinegar and strain.  I used a kitchen funnel to pour it into an empty milk jug.  It is just that easy and gives you a half gallon of cleaner.  I used this on everything in my kitchen, dinning and living room.  It smelled a little like vinegar for a little while and then you could only smell the oranges.  As with any cleaner, be careful with surfaces you normally clean gently.


Fancy right?  I put mine into a spray bottle and used my new Sham-wow.  Now I know you are laughing at the last. I was when we got ours in a gift basket for Christmas from Mark's work.  They always throw in some fun quirky stuff.  I really thought, hmmm, what the heck am I going to do with this thing?  So, thinking this way, I went under the sink for a rag (I recycle clothes and socks this way) and saw the Sham-wow.  It was fate.  That thing cleans like a champ!  It is so big and holds so much I only rinsed it maybe ten times.  I would have had to rinse it at least 30 or more if it had been one of my rags.  The time it saved was great!  So, WOW, lol.

Here is a great link to some other cleaning recipes: http://www.chachingqueen.com/2011/01/cleaning-products-you-can-make-at-home/?utm_source=feedburner&utm_medium=feed&utm_campaign=Feed:+ChaChingQueen+(Cha+Ching+Queen+-+Helping+you+Make+and+Save+Money)&utm_content=Google+Reader  I have not tried any of the recipes the Cha Ching Queen has listed yet, but I will be giving them a try.  I am pretty sure my mother and grandmother used some of these and positive my father used the same oven cleaner.  My Mom had asthma, so he would clean the oven that way for her.  That way she did not have to smell fumes from the commercial cleaners and possibly have an attack.  I have done a past post on the homemade laundry soap we made and we love that, use it almost everyday. You can look that up under cleaning recipes and tips on the left bar of this blog.

Any who, enjoy your spring cleaning this year, I know I will.  Just in case you need a Shamwow, lol, here is a link.


Friday, January 21, 2011

The Master No Knead Bread Dough and Recipes on how to use it.

So I found an Artesian Bread recipe on Mother Earth News and decided to give it a try, this was a few months ago.  I really did not believe all they said about how you can make it and just leave it in your fridge for a couple of weeks, using a little for a loaf when you want one, but I thought, what the heck it is worth the try.
I started with the smaller recipe and made one loaf, storing the rest.  I worked beautifully.  I did not have a pizza stone or cornmeal, but figured I would use my silpat cookie sheet and that would work and it did.
Since then I have been experimenting with it for you and I. I wanted to figure out what all we can do with it.  I also have made the large recipe twice.  I wanted this last one to go the full two weeks.  It still works just as well, just makes it into a sourdough bread.
Here are all the different pics from what we have done and at the end I will give you the recipe.  These guys have a book out, so I want to give credit where it is due, so I will list that too.  I have not read the book and don’t know if they used the master dough to make all of these things, but I did and I am LOVING it!

Okay, so the first time I did the big batch, it got away from me and over flowed everywhere and then when I stored it in a plastic bowl in the fridge, it escaped the bowl there too.  Make sure you put it in two bowls to rise if you are doing the 13 cups of flour batch.

I use my mixer and it makes even short work of 13 cups of flour believe it or not.  Here is the Kitchen Aide I own.  It saves me a whole lot of time.  You just slowly add the ingredients and it will mix it for you with the dough hook.  My guy and kids got it for me a few years ago.  I hardly had a chance to use it and now I am giving it a real work out!  Above is the first thing I made with the dough, just two normal loaves of bread.  I recomend you make at least one loaf after the first rise, I say that because it is will rise again a little even in your cold fridge.  You don't want to have to clean sticky wet dough all over your fridge like I did.  It was not fun.  See, I can make the dumb moves for you!
Here is my next move:


Pizza!  It was yummy.  We made about three this night because we had company and Mark was sure that there was not going to be enough for him.  The pizza was easy.  Flour your space you are going to roll on, look at your two fists put together and grab out a portion the same size from your bowl.  It will be wet and sticky.  This is a wet dough.  Let rest on the floured counter for 10 minutes before rolling out, this will  make it so the dough will roll better and thinner.  It takes some practice, just remember to add flour to the top and bottom of the dough while rolling, this will go for the next recipe too.  Once rolled into a square (or circle if you have a pizza stone or pan), tranfer to a lightly oiled or cornmealed cookie sheet or to a silpat cookie sheet.  Top with your favs!  For me, I make my own sauce because it is so easy.  Here is my quick recipe:
1 can tomato sauce
1 tablespoon tomato paste
1 tablespoon chopped garlic
2 teaspoons Italian seasoning
2 teaspoons salt
1 teaspoon pepper
taste and adjust
add to the top of dough in a thin layer, add pizza cheese, and toppings.  Mine had pepperoni, olives and mushrooms. Pre-heat oven to 425 degrees and check in 15.  It is done when bottom is golden brown and top is bubbly and melted.

I just realized this is getting huge and it is getting later in the day.  I will finish the post tomorrow, with the other two recipes I used for the dough so far.  Here is the recipe in case you want to give it a try tonight.

Mixing and Storing the Dough

1. Heat the water to just a little warmer than body temperature (about 100 degrees Fahrenheit).
2. Add yeast and salt to the water in a 5-quart bowl or, preferably, in a resealable, lidded container (not airtight — use container with gasket or lift a corner). Don’t worry about getting it all to dissolve.
3. Mix in the flour by gently scooping it up, then leveling the top of the measuring cup with a knife; don’t pat down. Mix with a wooden spoon, a high-capacity food processor with dough attachment, or a heavy-duty stand mixer with dough hook, until uniformly moist. If hand-mixing becomes too difficult, use very wet hands to press it together. Don’t knead! This step is done in a matter of minutes, and yields a wet dough loose enough to conform to the container.
4. Cover loosely. Do not use screw-topped jars, which could explode from trapped gases. Allow the mixture to rise at room temperature until it begins to collapse (or at least flatten on top), approximately two hours, depending on temperature. Longer rising times, up to about five hours, will not harm the result. You can use a portion of the dough any time after this period. Refrigerated wet dough is less sticky and easier to work with than room-temperature dough. We recommend refrigerating the dough at least three hours before shaping a loaf. And relax! You don’t need to monitor doubling or tripling of volume as in traditional recipes.
5. Prepare a pizza peel by sprinkling it liberally with cornmeal to prevent the loaf from sticking to it when you slide it into the oven.
Sprinkle the surface of the dough with flour, then cut off a 1-pound (grapefruit-sized) piece with a serrated knife. Hold the mass of dough in your hands and add a little more flour as needed so it won’t stick to your hands. Gently stretch the surface of the dough around to the bottom on four “sides,” rotating the ball a quarter-turn as you go, until the bottom is a collection of four bunched ends. Most of the dusting flour will fall off; it doesn’t need to be incorporated. The bottom of the loaf will flatten out during resting and baking.
6. Place the ball on the pizza peel. Let it rest uncovered for about 40 minutes. Depending on the dough’s age, you may see little rise during this period; more rising will occur during baking.
7. Twenty minutes before baking, preheat oven to 450 degrees with a baking stone on the middle rack. Place an empty broiler tray for holding water on another shelf.
8. Dust the top of the loaf liberally with flour, which will allow the slashing, serrated knife to pass without sticking. Slash a 1⁄4-inch-deep cross, scallop or tick-tack-toe pattern into the top. (This helps the bread expand during baking.)
9. With a forward jerking motion of the wrist, slide the loaf off the pizza peel and onto the baking stone. Quickly but carefully pour about a cup of hot water into the broiler tray and close the oven door to trap the steam. Bake for about 30 minutes, or until the crust is browned and firm to the touch. With wet dough, there’s little risk of drying out the interior, despite the dark crust. When you remove the loaf from the oven, it will audibly crackle, or “sing,” when initially exposed to room temperature air. Allow to cool completely, preferably on a wire rack, for best flavor, texture and slicing. The perfect crust may initially soften, but will firm up again when cooled.
10. Refrigerate the remaining dough in your lidded (not airtight) container and use it over the next two weeks: You’ll find that even one day’s storage improves the flavor and texture of your bread. This maturation continues over the two-week period. Cut off and shape loaves as you need them. The dough can also be frozen in 1-pound portions in an airtight container and defrosted overnight in the refrigerator prior to baking day.


The Master Recipe: Boule

(Artisan Free-Form Loaf)
Makes 4 1-pound loaves
3 cups lukewarm water
1 1⁄2 tbsp granulated yeast (1 1⁄2 packets)
1 1⁄2 tbsp coarse kosher or sea salt
6 1⁄2 cups unsifted, unbleached, all-purpose white flour
Cornmeal for pizza peel

Tips to Amaze Your Friends

The “6-3-3-13” rule. To store enough for eight loaves, remember 6-3-3-13. It’s 6 cups water, 3 tablespoons salt, 3 tablespoons yeast, and then add 13 cups of flour. It’ll amaze your friends when you do this in their homes without a ­recipe!
Lazy sourdough shortcut. When your dough container is empty, don’t wash it! Just scrape it down and incorporate it into the next batch. In addition to saving cleanup, the aged dough stuck to the sides will give your new batch a head start on sourdough flavor.
Variation: Herb Bread. Add a couple teaspoons of your favorite dried herbs (double if fresh) to the water mixture.
Here is the book this is from.  I will see you tomorrow for the rest!

This is there book with many more bread recipes in case you are interested.

Tuesday, December 14, 2010

Ebates Reminder

Just a little reminder to use Ebates this year on the on-line purchases you would make anyway.  My daughter just got a check today for $12.24.  This is free money back on things she would have bought anyway.  Different stores offer a different percentage back, but their are tons of stores you would regularly buy from, including e-bay and other large retailers.  Give it a try, they give you a $5 credit just for signing up and more credits for people you refer.  http://www.ebates.com/rf.do?referrerid=CiLVww1WEtTo1ijnf0O8xQ%3D%3D

Monday, December 13, 2010

A few great things FREE

Posting these from Facebook!  Try them out!  Too much fun!


Zombie Proof Homemaking Gonna try this one this year and see what happens. I think it will be fun to get a call from Santa! It is FREE!

This Site uses Macromedia Flash and Javascript. Please enable Javascript in your browser, and then click Santa. If you need Flash, you can install the latest version free from:http://get.adobe.com/flashplayer/
Yesterday at 9:18am ·  ·  · Share · Promote
Zombie Proof Homemaking

Zombie Proof Homemaking This is the greatest Christmas tool for parents and grandparents! You can track Santa Christmas Eve through Norad and Google Earth. The children can actually see where Santa is, so you can get them tucked in bed before he gets to your house. We have been doing this for years and it works! Also great games on the site.

Follow Santa as he makes his magical journey!

Wednesday, December 1, 2010

Homemade Christmas

This year we are choosing to have a Homemade Christmas.  Yes, it is motivated by budget, but truly, finding creative ways to spend little or no money is FUN!  Devin is making Christmas ornaments for people.  He and Mark came up with the great idea of slicing up last years Christmas tree.  We have a wood stove, so they had stored it on top of the woodpile to be burned later.  Now it will be part of our Christmas celebration forever.  I am not really showing many finished products, since some of the people who read this are on my list, but here is the beginnings of their project.  Should be fun to see what they come up with.

I am working on some paintings and crocheting.  Have a few other things under our belts that include granite and other fun stuff.  Here are some of the crotchet projects.

But the thing I found that I want to share with you I am really excited about.  With my children, some kind of electronic gift is what the two youngest really want, 10 and 18.  Well check this out, you may already know, but I didn't, Amazon has a free Kindle download for your PC.  Plus, they have a huge amount of free books for the program.  I just got the program and 15 books for the kids for FREE.  Not only that, I did not even touch on all the free books, they offer a ton.  Classics and new books, even games.  Some of the games will not download to the PC version, but hey, I am happy.  Here is what I suggest,  for family members you can put this on their computers without their knowledge and tell them on Christmas day in a card, or if you are giving as a gift to a college student, copy the program to a CD and include a word doc with written instructions.  It was super easy though.  I already had an account, so you may have to open one if you don't.  Click on the link below, Alice's Adventures in Wonderland, on the right side on Amazon there is a BUY NOW WITH ONE CLICK button, you will see Get Kindle for PC below that.  Click there and follow the directions.  Then, just shop at the Kindle Book Store.  So great to get The Wizard of Oz, The Secret Garden and the Junglebook for free along with some new titles.  You can also buy titles for the PC version.  My children LOVE to read, so they are going to like this!  Okay, so today is Pay it Forward day, so here you go!  As for me, I downloaded a few titles I think I might enjoy, so I am taking a break and reading a little!  Enjoy!

Tuesday, November 30, 2010

Ebates

Okay, here is a really good deal.  Ebates is a site that pays you cash back to shop on-line places you would anyway.  If you sign up with this link Ebates, you will get $5 to start your cash back account.  My daughter bought all her phone accessories and will get quite a bit back.  Great idea and deal!  Always try and save all I can this time of year!

Saturday, November 13, 2010

Easy as Apples

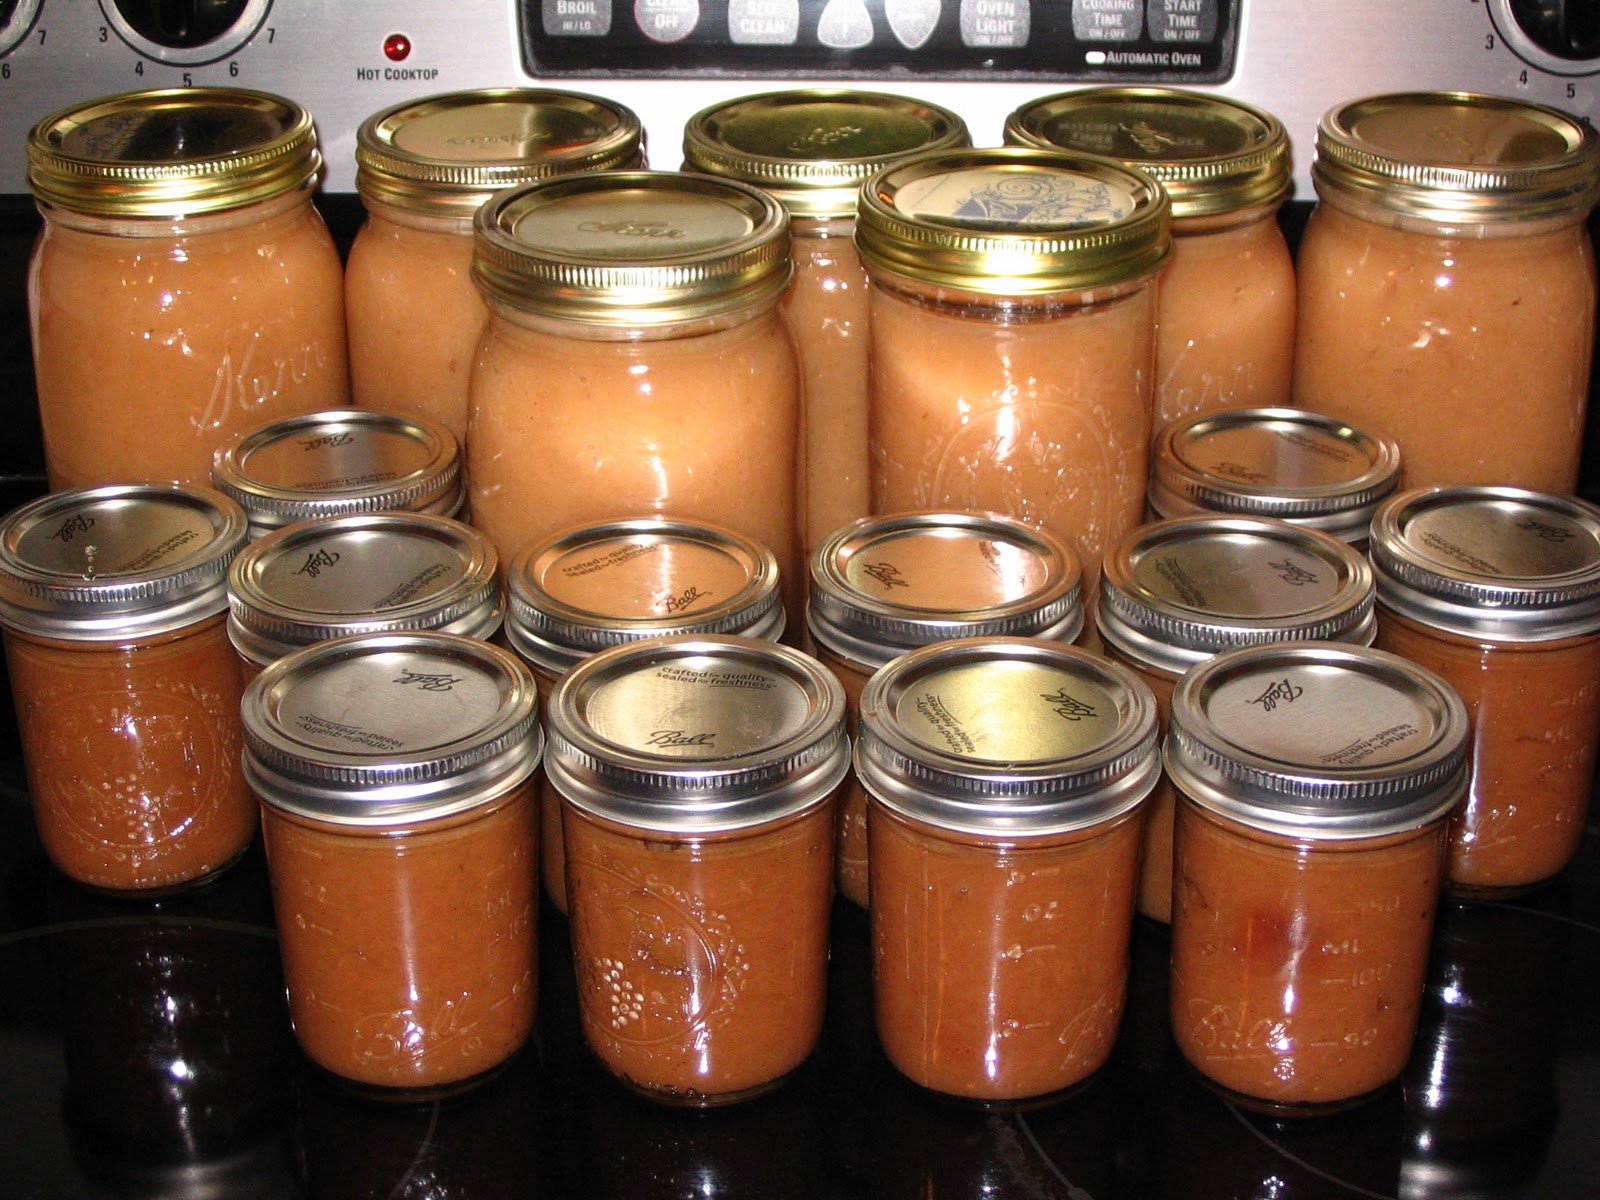
We were lucky in a few ways this year as far as our gleaning went.  Our wonderful neighbors Terry and Shirley not only shared all of their left over tomatoes with us, but also all of their canning jars.  This was wonderful and truly a windfall for us.  Thank you again Terry and Shirley for all!!!  Then our friend Bonnie told us we could come out to the farm and glean apples.  We really went to visit with her, but also got lots of apples.  We came home and this is what we did.

Apple Butter/Sauce

Wash all the apples
Cut all the apples into quarters (do not take out cores or seeds)
Fill to one inch below the top of a six quart pan with the apples
add 1/3 cup honey
add one teaspoon of salt
add 4 cups water

Cook down until apples are tender, about the same as you would cook for mashed potatoes.  Add cooked ingredients a small amount at a time to a food mill.  I find cranking 3 times to the right and once to the left seems to speed it up a bit.  Process all the apples this way and add to a crock pot, cook on low for 4 to six hours until apples are a medium brown for apple butter, stirring occasionally.  For applesauce add back to pan, bring to a simmer, cook until you get the consistency you would like.  Hot pack into canning jars leaving half inch of head space.  Put in boiling canner, process for 10 minutes, here is a chart to help with elevation times:

Altitude Adjustments for Boiling Water Bath Canner
Altitude in Feet
Increase processing time
1001-3000
5 minutes
3001-6000
10 minutes
6001-8000
15 minutes
8001-10,000
20 minutes
Remove from canner when processed and allow to cool, listen for those lids.  I love that POP!  We did two batches this way, one of butter and one of sauce.  Here is our reward!

Monday, November 8, 2010

Laundry Day at the OK!

Okay, so I didn’t actually keep my promise to post the week after my last blog.  Got sick and then sicker, but am feeling a little better now.  I actually was busy doing things when I was feeling okay in prep for my blog.  Let me share what I found!  Laundry soap!  
These ingredients cost me $7.58 cents at Winco.  Imagine making the equivalent of 10 gallons of laundry soap for that price.  Not only that, I will at least three more batches from the borax and super washing soda, only having to purchase the Fels-Naptha for $2.50 a bar for the next batches.  This means 30 gallons of laundry soap for 12.58…..crazy talk.  How can you do it too?  Well easy, here is the recipe and some pictures to follow along with.  I got this recipe from the Duggar Website, they have 19 children who all manage to look clean on TV, so I figured it must work and it does.  Here is their site, if you care to look. http://www.duggarfamily.com/recipes.html
Homemade Liquid Laundry Soap- Front or top load machine- best value
4  Cups - hot tap water
1  Fels-Naptha soap bar
1 Cup - Arm & Hammer Super Washing Soda*
½ Cup Borax

- Grate bar of soap and add to saucepan with water. Stir continually over medium-low heat until soap dissolves and is melted.  This takes about 20 minutes, so it's nice to have someone else around to take over in case your arm gets tired.  Mine got tired!


 -Fill a 5 gallon bucket half full of hot tap water. Add melted soap, washing soda and Borax. Stir well until all powder is dissolved. Fill bucket to top with more hot water. Stir, cover and let sit overnight to thicken.


-Stir and fill a used, clean, laundry soap dispenser half full with soap and then fill rest of way with water. Shake before each use. (Will gel)
-Optional: You can add 10-15 drops of essential oil per 2 gallons. Add once soap has cooled. Ideas: lavender, rosemary, tea tree oil.
-Yield: Liquid soap recipe makes 10 gallons.
-Top Load Machine- 5/8 Cup per load (Approx. 180 loads)
-Front Load Machines- ¼ Cup per load (Approx. 640 loads)
*Arm & Hammer "Super Washing Soda".  Baking Soda will not work, nor will Arm & Hammer Detergent - It must be sodium carbonate!!
If you have a stubborn stain, pour a little on the stain, rub in and let sit for at least 10 minutes before washing. Even worked for our daughter who has sensitive skin!  Good luck and enjoy the recipe and the clean clothes.

Wednesday, October 20, 2010

Gleaning Your Own Neighborhood

A short post on Gleaning.  Gleaning is the process of collecting the end of the harvest that no one else wants.  We went to a friends farm this weekend (thank you Bonnie) and they had so many apples still on the trees.  It got me thinking about my own neighborhood and how much food goes to waste just rotting on the ground.  Bonnie was nice enough to let us pick as many apples as we wanted and my girls got the benefit of the filberts (hazel nuts) that had fallen beneath the tree.  Bonnie explained to us that they can never use as many apples as they grow and have asked people in their church to come pick as many as they want.  Unfortunately, no one wants to come pick them.
When I got home I started looking around my own neighborhood and was shocked to see how many people have apples rotting away.  I am sure that when I ask, they will be more that happy to have my family come pick them, it will cut down on their clean-up.
I am drying the nuts in their shells and will have a family adventure in hulling and roasting them this weekend.  I am making and canning apple butter this weekend as well.  I will take pictures and post the recipe when I am done.
My friend Fawn and I are making the laundry soap, probably on Saturday and we will let you know how that goes.  Should be a rash of good posts next week!!!  Enjoy your day and think about the money you can save in your own neighborhood by gleaning and canning.  Free is a very good price!

Thursday, October 14, 2010

An Adventure in Bread Making

Here's my story: I had bought a forty pound bag of flour at Costco ( I think it was around $7.00), not because I needed that much, just because I was in a hurry, needed some and did not want to make another stop.  Ever do that? So here I was with all this all purpose flour, what to do with it?  Make bread and save some money right?  Well, all the recipes I found wanted bread flour.

In the past when I wanted home baked bread, I bought the frozen kind from the store, or a loaf of warm french bread.  Both are more expensive and not that good for you.  I searched and searched for a really easy recipe that could fix all of that for me and found one at allrecipes.com for Amish Friendship bread.  With some tweaking, ended up with something really good and versatile for my family.  Of course it had to be fast too and this one is. Give it a try and see what you think.  My family is now upset if they don't get their bread fix at least every other day.  This recipe makes two big loaves, so I freeze one to use one the next bread fix day.  This means this takes me about 20 minutes prep time every four days, easy peezy, I can do that!


Ingredients
2 cups warm water (110 degrees F/45 degrees C)
1/3 cup honey (you can use white sugar, but we are trying to get it out of our diet)
1 1/2 tablespoons active dry yeast (I use bakipan fast rising instant yeast)
1 1/2 teaspoons salt
1/4 cup vegetable oil
6 cups all purpose flour (you can use bread flour or wheat if you prefer)


Directions

In a large bowl, dissolve the honey in warm water, and then stir in yeast. Allow to proof until yeast makes a creamy foam.

Mix salt and oil into the yeast. Mix in flour one cup at a time. (I do this whole process in my mixer with a bread hook, it goes fast).  Dough may come out a little sticky due to the honey, but will firm up when you knead it.  Knead dough on a lightly floured surface until smooth (It just takes a few kneads to do this). Place in a well oiled bowl, and turn dough to coat. Cover with a damp cloth. Allow to rise until doubled in bulk, about 1 hour.

Punch dough down. Knead for a few minutes, and divide in half. Shape into loaves, and place into two well oiled 9x5 inch loaf pans. Allow to rise for 30 minutes, or until dough has risen 1 inch above pans.

Bake at 350 degrees F (175 degrees C) for 30 minutes.

This is a great all purpose recipe, use for rolls, pizza crust or even knead in garlic powder and herbs (I use Italian seasoning) and shape like a French bread loaf on a oiled cookie sheet, cover with a towel and let rise.  This makes a great alternative to heavily buttered French bread and tastes great.  Just eyeball the amounts like you do on your regular garlic bread and you will have a great loaf!  Enjoy and keep me posted on how it goes for you!

Wednesday, October 13, 2010

Well Here we go!!!

Hello everyone.  I decided to start a little blog about my adventures in Zombie proofing my home.  Now I know everyone is saying, "What?  Zombie proofing your home????".  Yep!
There are a whole lot of sites out there that talk about what to do in a disaster, how to store food in the event of one and all that jazz.  What this blog is going to be about is the fact that The Zombie Apocalypse is already here... sort of.  I look around my neighborhood and many have lost their jobs and are living on one income, some are surviving on just unemployment.  The economy is recovering they say, but they also say it is a jobless recovery. I lost my job two years ago and unemployment is gone!  We are making due with one income.
Prices are going up and so I have been researching how to save money and posting my discoveries on Facebook.  There seems to be some interest, so I am starting this blog so I can easily share what I am learning with all of you. I will be posting recipes mostly, but as I research, who knows what all I will find!
So far we have done a whole lot of gardening, I have learned to bake, we have learned to can (Mark really likes canning too) and my next adventure to keep out the Zombies is laundry detergent making!  I will post later to tell you how it went and the discoveries I made along the way.  So follow my blog and join in the discoveries!
In the meantime here is a recipe I made up for all the green tomatoes that seem to be out there with nothing to do.  I am also including one to use the salsa.  Try them and see what you think.  I would love to hear your feedback.


Salsa

3 large onions (white, yellow or sweet)
1 large red onion
4 cooked, skinned and seeded Anaheim peppers (more if you like it hotter)
10 pounds tomatoes (I used all the tomatoes from my neighbors and ours too, so a combo of different types and filled an 8 quart stainless steel pot two inches from the top)
2 tablespoons chili flakes
2 tablespoons salt
½ cup lemon or lime juice (I used lemon)
8 cloves garlic
1 large bunch cilantro, chopped

Add everything to the pot stirring occasionally until it comes to a boil, turn down and simmer for 20 minutes.  Pack right away, I used 9 pint and a half jars leave 1 full inch of head-space.  Can in your pressure canner at ten pounds of pressure for 45 minutes!

Green Salsa:

Same as above with these exceptions; I use 2 jalapenos and just one tablespoon of chili flake; I just use the yellow onions and omit the red.  I also cook this for about 40 minutes instead of 20 before canning.  This is a great salsa by itself, but you can also take your already canned jars and pour into your food processor, blend until smooth and use it to make enchiladas or Mexican chicken casserole (See recipe below).  You can of course freeze this instead of canning.

Disclaimer:  Please do your research on canning times as they will vary with elevation and jar size.  Canning times are important in the prevention of bacteria that can cause botulism.  Follow the canning directions that come with your pressure cooker carefully.

Mexican Chicken Casserole

4 boneless skinless chicken breast cooked and chopped into bite size pieces (this is great for leftovers too)
1 can cheddar soup
1 can cream of chicken soup
2 cans black beans
1 small package frozen corn
1 pint and a half size jar of green salsa (or same amount of store bought)
2 cups cheese of your choice (already shredded Mexican blend or Colby jack works well)
6 taco size flour tortillas
Olive oil to coat baking dish

Pre-heat oven to 350.  In a large bowl mix together chicken, both soups, black beans and thawed corn.  In a 9X13 oiled baking dish lay four of the tortillas to cover the bottom and sides of the dish.  Add half of the mixture over the tortillas, spread evenly.  Top with half the salsa and half the cheese.  Add two more tortillas to cover the top and repeat.  Place in the oven for 30 minutes and check.  It is done when cheese is melted and ingredients are bubbling!  Serve with sour cream and hot sauce.

We ate this for two nights and we are a family of four with healthy appetites.  Enjoy!